Multiple file uploads with Dropzone.js and Laravel Medialibrary Package 👨🏿🏫
Multiple File upload with Dropzone js and Laravel Medialibrary. Multiple or single File Upload with Dropzone and Laravel MediaLibrary Package. 2 forms or a single form use as dropzone form and then upload files article.
Hi, my name is Hassam. I am a Full Stack Developer and in this tutorial, we create A simple project to add a Product with thumbnail image and Gallery images.
Before starting you need to know a few things. Product form requires a <form> and dropzone also require a <form> means we can’t use <form> inside a form tag. so, How do we implement this because we are going to add two dropzone forms? The answer is we will create three forms or maybe two its depends on your requirement but I’ll cover both scenarios because most of the developers have issues with how to upload multiple images with other form fields.
Source code: https://github.com/hassamulhaq/dropzone-laravel-medialibrary-fileupload-demo [visit]
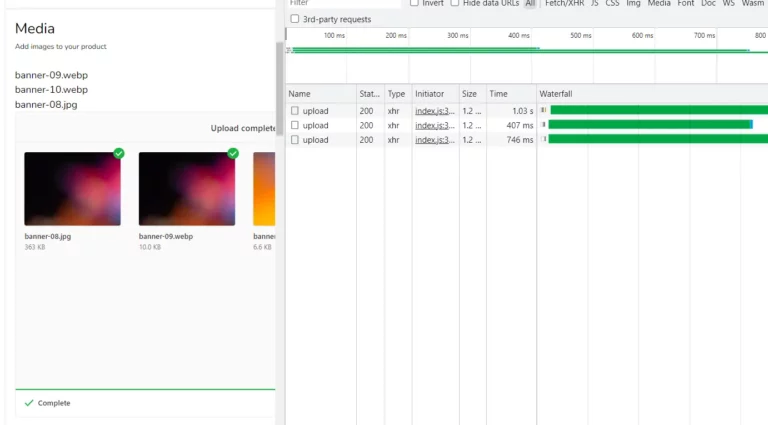
Preview
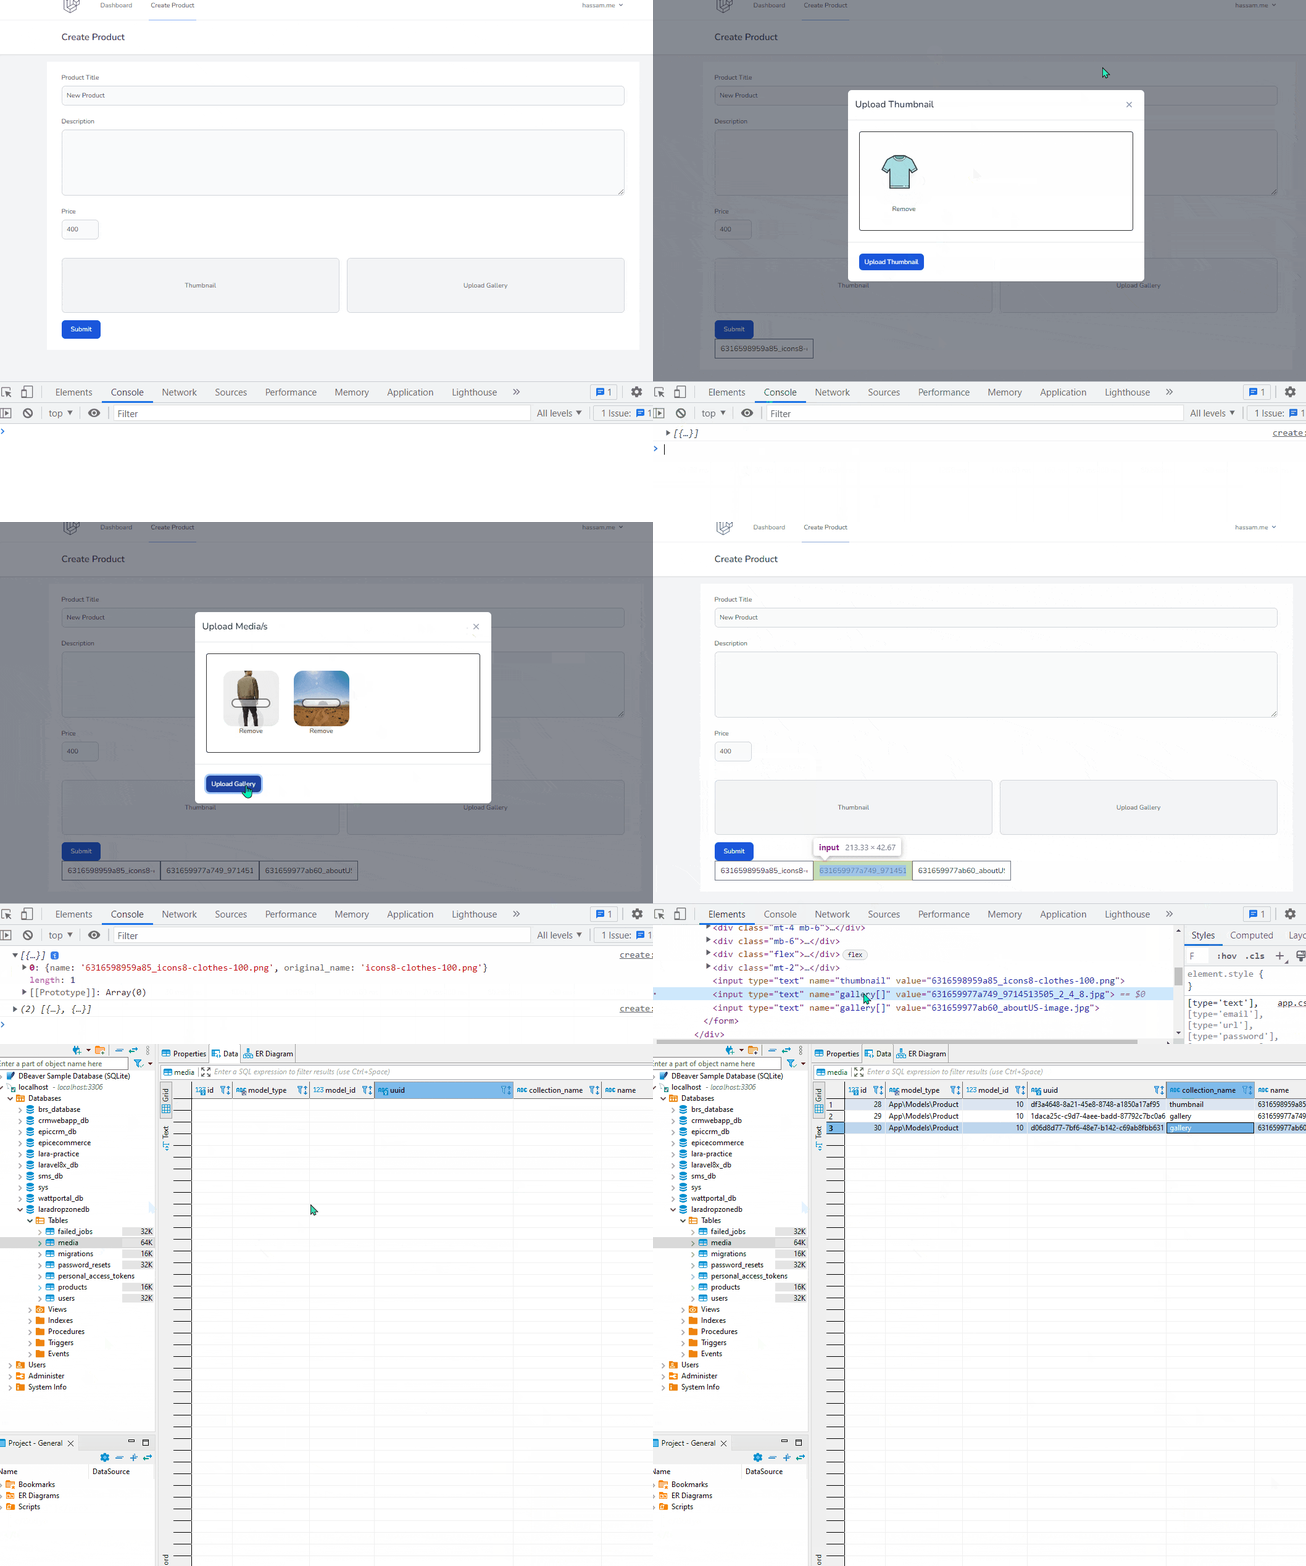
Queries we will solve
- We want to use dropzone because of its nice UI.
- But dropzone works under Ajax request so how we can pass other form data?
- dropzone require a <form> but create product also require a <form> so, how we can do it? as we know we can’t use <form> inside a <form>
- we also use laravel-medialibrary package, and this package require a Model_Id to save data in media table against that model_id. but when we also use dropzone and it sends a Ajax request but on that time we have no model_id (product_id) because after creating product we will get a model_id and using that modal_id we can use laravel-medialibrary. so, when we are on /create-product/ page we don’t know the model_id because product is not saved yet. how to handle this?
- We create two or three forms.
- one <form> is for create product (product_name, description, price)
- second <form> is for dropzone multiple images upload
- third <form> is for thumbnail (optional)
- dropzone Multiple file upload form working is
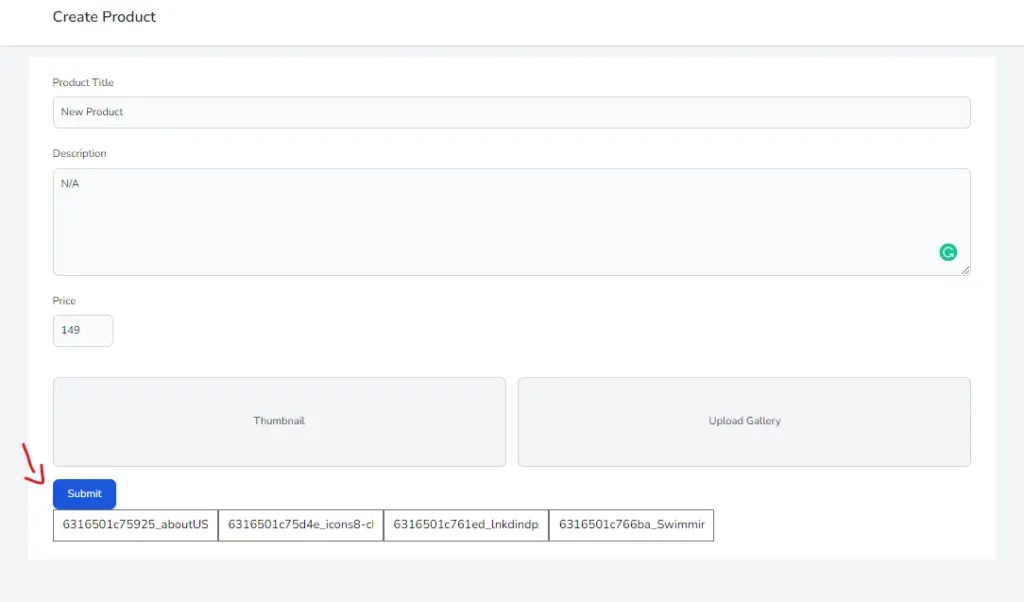
- when users drag-and-drop images on dropzone form an Ajax request send by dropzone, in backend we’ll store those images in temporary folder with a unique name as per file, and in returns, we will return an array of images with path. and using javascript we will create or append new input fields in create-product form like <input type=”hidden” name=gallery[] value=”1452_hassam_profile.png”>, if user upload 2 images then 2 new hidden inputs will be append in create-product form.
- and when a user submits the create-product form the hidden input data is also sent to the backend, and in backend we first save product, and after saving the product we get last inserted-model-id using
$product->id. and finally, loop on hidden fields get the value of input and trigger laravel-medialibrary function. now we have both model_id and image. laravel-medialibrary pick the image from /tmp/images/ and move it in storage and also made an entry in the database against model_id (product_id).
Download the javascript and CSS files I used in this tutorial. [ DOWNLOAD ]
1. Install Fresh Laravel
composer create-project laravel/laravel laradropzone
npm install
composer require laravel/breeze --dev
Create a database and made an entry in .env
DB_CONNECTION=mysql
DB_HOST=127.0.0.1
DB_PORT=3306
DB_DATABASE=laradropzonedb
DB_USERNAME=root
DB_PASSWORD=
Set database engine to InnoDB
config/database.php

'mysql' => [
    'engine' => 'InnoDB',
],
set defaultStringLength is 191 in AppServiceProvider.php
app/providers/AppServiceProvider.php

public function boot()
{
    Schema::defaultStringLength(191);
}
Install Breez package and config it
php artisan breeze:install

php artisan migrate
npm install
npm run dev
Install Flowbite and configure it. Why flowbite?
You can also use bootstrap instead of flowbite. I use flowbite because it is based on tailwindCSS and I need to trigger a Modal Popup for a Modal I need to write a separate js code but flowbite can do it for me. If you use bootstrap then you can skip the installation of flowbite, or if you have a javascript code to popup a Modal then also skip the installation of flowbite.
you can also visit flowbite website for configuration flowbite in Laravel. https://flowbite.com/docs/getting-started/laravel/ link.
Download flowbite and dropzone assets => Download
npm install -D tailwindcss postcss autoprefixer flowbite
npx tailwindcss init
Add the view paths and require Flowbite as a plugin inside tailwind.config.js
const defaultTheme = require('tailwindcss/defaultTheme');

/** @type {import('tailwindcss').Config} */
module.exports = {
    content: [
        "./resources/**/*.blade.php",
        "./resources/**/*.js",
        "./resources/**/*.vue",
        "./node_modules/flowbite/**/*.js"
    ],

    theme: {
        extend: {
            fontFamily: {
                sans: ['Nunito', ...defaultTheme.fontFamily.sans],
            },
        },
    },

    plugins: [
        require('@tailwindcss/forms'),
        require('flowbite/plugin')
    ],
};
Add flowbite js in the layout /resources/views/layouts/app.blade.php
You can use either CDN or stand-alone javascript. assets are provided => download them and add in…
I pasted flowbite.js in public/plugins/[email protected]/
Add below code in resources/views/layouts/app.blade.php
		<script src="{{ asset('plugins/[email protected]/flowbite.js') }}"></script>
		{{--<script src="https://unpkg.com/[email protected]/dist/flowbite.js"></script>--}}

		@stack('footer_scripts')
    </body>
</html>
@stack('footer_scripts') here we can inject javascript code from child components using @push
2. Create Product Model, Controller and MediaController
we will add the code of the controller and modal later. MediaController will take care of files uploaded by dropzone form.
and Product Model and Controller are for handling product create data.
Product // Model
ProductsController
MediaController
Migration code of Products table.
return new class extends Migration {
    public function up()
    {
        Schema::create('products', function (Blueprint $table) {
            $table->id();
            $table->string('name')->nullable();
            $table->text('description')->nullable();
            $table->string('price')->nullable();
            $table->timestamps();
        });
    }

    public function down()
    {
        Schema::dropIfExists('products');
    }
};
3. Add routes in web.php
Route::get('products', [ProductsController::class, 'index'])->middleware('auth:sanctum')->name('products.index');
Route::get('products/create', [ProductsController::class, 'create'])->middleware('auth:sanctum')->name('products.create');
Route::post('products/store', [ProductsController::class, 'store'])->middleware('auth:sanctum')->name('products.store');


Route::post('upload-media', MediaController::class)->middleware('auth:sanctum')->name('upload-media');
Also read: 20 API-related terms, How to add sticky menu in footer flatsome theme
4. Create a product folder in views
/views/products/

index.blade.php
create.blade.php
5. Return view from ProductsController.php
public function create()
{
    return view('products.create');
}
6. Product create blade code
in this create blade we have
- Product title input
- Product description textarea input
- Product price input
- and Dropzone two forms
- Multiple file upload form (it’s a Modal Popup)
- Single file upload form (also a Modal popup)
Now we need to 2 Popup Modals for dropzone
But first I config the multiple files upload dropzone and in last we’ll cover single file upload functionality.
views/products/create.blade.php


<x-app-layout>
    <x-slot name="header">
        <h2 class="font-semibold text-xl text-gray-800 leading-tight">
            {{ __('Create Product') }}
        </h2>
    </x-slot>

    <div class="bg-white mt-4 max-w-7xl mx-auto py-6 px-4 sm:px-6 lg:px-8">
        <form method="post" action="{{ route('products.store') }}" enctype="multipart/form-data" autocomplete="off">
            @csrf

            <div class="mb-6">
                <label for="title" class="block mb-2 text-sm font-medium text-gray-900 dark:text-gray-300">Product Title</label>
                <input type="text" id="title" name="title" class="bg-gray-50 border border-gray-300 text-gray-900 text-sm rounded-lg focus:ring-blue-500 focus:border-blue-500 block w-full p-2.5 dark:bg-gray-700 dark:border-gray-600 dark:placeholder-gray-400 dark:text-white dark:focus:ring-blue-500 dark:focus:border-blue-500">
            </div>
            <div class="mt-4 mb-6">
                <label for="description" class="block mb-2 text-sm font-medium text-gray-900 dark:text-gray-300">Description</label>
                <textarea id="description" rows="6" name="description" class="bg-gray-50 border border-gray-300 text-gray-900 text-sm rounded-lg focus:ring-blue-500 focus:border-blue-500 block w-full p-2.5 dark:bg-gray-700 dark:border-gray-600 dark:placeholder-gray-400 dark:text-white dark:focus:ring-blue-500 dark:focus:border-blue-500"></textarea>
            </div>
            <div class="mb-6">
                <label for="price" class="block mb-2 text-sm font-medium text-gray-900 dark:text-gray-300">Price</label>
                <input type="number" id="price" name="price" class="bg-gray-50 border border-gray-300 text-gray-900 text-sm rounded-lg focus:ring-blue-500 focus:border-blue-500 block w-20 p-2.5 dark:bg-gray-700 dark:border-gray-600 dark:placeholder-gray-400 dark:text-white dark:focus:ring-blue-500 dark:focus:border-blue-500">
            </div>

            <div class="flex">
                <div class="mt-4 mr-2 mb-2 w-full">
                    <!-- #singleMediaDropzoneModal is in component media-form-single-dropzone -->
                    <button type="button" data-modal-toggle="singleMediaDropzoneModal" class="text-sm px-5 py-12 text-center block w-full text-gray-700 bg-gray-100 border border-gray-300 hover:bg-gray-200 focus:ring-2 focus:outline-none focus:ring-gray-300 font-medium rounded-lg dark:bg-blue-600 dark:hover:bg-blue-700 dark:focus:ring-blue-800">
                        Thumbnail
                    </button>
                </div>
                <div class="mt-4 ml-2 mb-2 w-full">
                    <button type="button" data-modal-toggle="multiMediaDropzoneModal" class="text-sm px-5 py-12 text-center block w-full text-gray-700 bg-gray-100 border border-gray-300 hover:bg-gray-200 focus:ring-2 focus:outline-none focus:ring-gray-300 font-medium rounded-lg dark:bg-blue-600 dark:hover:bg-blue-700 dark:focus:ring-blue-800">
                        Upload Gallery
                    </button>
                </div>
            </div>

            <div class="mt-2">
                <button type="submit" class="text-white bg-blue-700 hover:bg-blue-800 focus:ring-4 focus:outline-none focus:ring-blue-300 font-medium rounded-lg text-sm sm:w-auto px-5 py-2.5 text-center dark:bg-blue-600 dark:hover:bg-blue-700 dark:focus:ring-blue-800">Submit</button>
            </div>
        </form>
    </div>


    <!-- dropzone multiple modal popup -->
    <div id="multiMediaDropzoneModal" tabindex="-1" aria-hidden="true" class="hidden overflow-y-auto overflow-x-hidden fixed top-0 right-0 left-0 z-50 w-full md:inset-0 h-modal md:h-full">
        <div class="relative p-4 w-full max-w-2xl h-full md:h-auto">
            <!-- Modal content -->
            <div class="relative bg-white rounded-lg shadow dark:bg-gray-700">
                <!-- Modal header -->
                <div class="flex justify-between items-center items-start p-4 rounded-t border-b dark:border-gray-600">
                    <h3 class="text-xl font-semibold text-gray-900 dark:text-white">
                        Upload Media/s
                    </h3>
                    <button type="button" data-modal-toggle="multiMediaDropzoneModal" class="text-gray-400 bg-transparent hover:bg-gray-200 hover:text-gray-900 rounded-lg text-sm p-1.5 ml-auto inline-flex items-center dark:hover:bg-gray-600 dark:hover:text-white">
                        <svg aria-hidden="true" class="w-5 h-5" fill="currentColor" viewBox="0 0 20 20" xmlns="http://www.w3.org/2000/svg"><path fill-rule="evenodd" d="M4.293 4.293a1 1 0 011.414 0L10 8.586l4.293-4.293a1 1 0 111.414 1.414L11.414 10l4.293 4.293a1 1 0 01-1.414 1.414L10 11.414l-4.293 4.293a1 1 0 01-1.414-1.414L8.586 10 4.293 5.707a1 1 0 010-1.414z" clip-rule="evenodd"></path></svg>
                        <span class="sr-only">Close modal</span>
                    </button>
                </div>
                <!-- Modal body -->
                <div class="p-6 space-y-6">
                    <form action="{{ route('upload-media') }}" method="post" id="mediaFormMultipleDropzone" class="dropzone" enctype="multipart/form-data">
                        @csrf
                    </form>
                </div>
                <!-- Modal footer -->
                <div class="flex items-center p-6 space-x-2 rounded-b border-t border-gray-200 dark:border-gray-600">
                    <input id="submit-dropzone" type="submit" name="submitDropzone" value="Upload Gallery" class="cursor-pointer py-2 px-3 text-sm font-medium text-center text-white bg-blue-700 rounded-lg hover:bg-blue-800 focus:ring-4 focus:outline-none focus:ring-blue-300 dark:bg-blue-600 dark:hover:bg-blue-700 dark:focus:ring-blue-800"/>
                </div>
            </div>
        </div>
    </div>


    <!-- dropzone single modal popup -->
    <div id="singleMediaDropzoneModal" tabindex="-1" aria-hidden="true" class="hidden overflow-y-auto overflow-x-hidden fixed top-0 right-0 left-0 z-50 w-full md:inset-0 h-modal md:h-full">
        <div class="relative p-4 w-full max-w-2xl h-full md:h-auto">
            <!-- Modal content -->
            <div class="relative bg-white rounded-lg shadow dark:bg-gray-700">
                <!-- Modal header -->
                <div class="flex justify-between items-center items-start p-4 rounded-t border-b dark:border-gray-600">
                    <h3 class="text-xl font-semibold text-gray-900 dark:text-white">
                        Upload Thumbnail
                    </h3>
                    <button type="button" data-modal-toggle="singleMediaDropzoneModal" class="text-gray-400 bg-transparent hover:bg-gray-200 hover:text-gray-900 rounded-lg text-sm p-1.5 ml-auto inline-flex items-center dark:hover:bg-gray-600 dark:hover:text-white">
                        <svg aria-hidden="true" class="w-5 h-5" fill="currentColor" viewBox="0 0 20 20" xmlns="http://www.w3.org/2000/svg"><path fill-rule="evenodd" d="M4.293 4.293a1 1 0 011.414 0L10 8.586l4.293-4.293a1 1 0 111.414 1.414L11.414 10l4.293 4.293a1 1 0 01-1.414 1.414L10 11.414l-4.293 4.293a1 1 0 01-1.414-1.414L8.586 10 4.293 5.707a1 1 0 010-1.414z" clip-rule="evenodd"></path></svg>
                        <span class="sr-only">Close modal</span>
                    </button>
                </div>
                <!-- Modal body -->
                <div class="p-6 space-y-6">
                    <form action="{{ route('upload-media') }}" method="post" id="mediaFormSingleDropzone" class="dropzone" enctype="multipart/form-data">
                        @csrf
                    </form>
                </div>
                <!-- Modal footer -->
                <div class="flex items-center p-6 space-x-2 rounded-b border-t border-gray-200 dark:border-gray-600">
                    <input id="submit-single-dropzone" type="submit" name="submitSingleDropzone" value="Upload Thumbnail" class="cursor-pointer py-2 px-3 text-sm font-medium text-center text-white bg-blue-700 rounded-lg hover:bg-blue-800 focus:ring-4 focus:outline-none focus:ring-blue-300 dark:bg-blue-600 dark:hover:bg-blue-700 dark:focus:ring-blue-800"/>
                </div>
            </div>
        </div>
    </div>
</x-app-layout>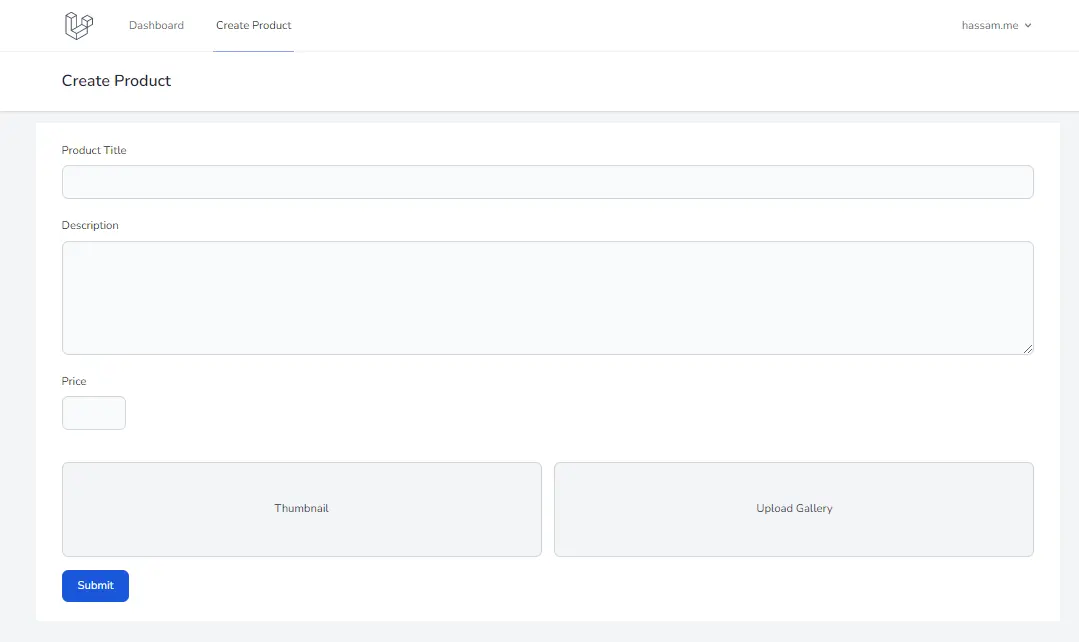
7. Now add jQuery and dropzone bundle
https://www.dropzone.dev/js/ for details.
add dropzone js/css in resources/views/layouts/app.blade.php before <head>
<link rel="stylesheet" href="{{ asset("/plugins/[email protected]/dropzone.css") }}">
<script src="{{ asset("plugins/[email protected]/dropzone-min.js") }}"></script>
8. Config dropzone scripts and form
in /resources/views/products/create.blade.php add the below code before </x-app-layout>
Do you remember we added @stack('footer_scripts') in /resources/views/layouts/app.blade.php so, now we will inject the js code of dropzone using @push()
Few configuration for dropzone setup
- paramName: “files” ( $request->input(‘files’) )
- uploadMultiple: true,
- maxFiles: 5,
- myDropzone.on(“successmultiple” …) (in single file we use Dropzone.on(“success”)
// Multiple file upload code of dropzone form

@push('footer_scripts')
<script>
    /*
    * Dropzone script
    * */
    // disable autodiscover
    Dropzone.autoDiscover = false;

    //const filesize = 5;
    const allowMaxFilesize = 5;
    const allowMaxFiles = 5;

    const myDropzone = new Dropzone("#mediaFormMultipleDropzone", {
        url: "{{ route('upload-media') }}",
        method: "POST",
        paramName: "files",
        autoProcessQueue: false,
        acceptedFiles: ".jpeg,.jpg,.png,.gif",
        maxFiles: allowMaxFiles,
        maxFilesize: allowMaxFilesize, // MB
        uploadMultiple: true,
        parallelUploads: 100, // use it with uploadMultiple
        createImageThumbnails: true,
        thumbnailWidth: 120,
        thumbnailHeight: 120,
        addRemoveLinks: true,
        timeout: 180000,
        dictRemoveFileConfirmation: "Are you Sure?", // ask before removing file
        // Language Strings
        dictFileTooBig: `File is to big. Max allowed file size is ${allowMaxFilesize}mb`,
        dictInvalidFileType: "Invalid File Type",
        dictCancelUpload: "Cancel",
        dictRemoveFile: "Remove",
        dictMaxFilesExceeded: `Only ${allowMaxFiles} files are allowed`,
        dictDefaultMessage: "Drop files here to upload",
    });

    myDropzone.on("addedfile", function(file) {
        // while file is drag or add in dropzone form maybe you want some other functionality
        // as per file then you can write code in this block
        //console.log(file);
    });

    myDropzone.on("removedfile", function(file) {
        // while file is remove from dropzone form maybe you want some other functionality
        // as per file remove then you can write code in this block
        // console.log(file);
    });

    // Add more data to send along with the file as POST data. (optional)
    // I commented below code why? when the file is send maybe you want to pass some other form input data so, you
    // you can pass it in this block. BUT in this tutorial I'm using dropzone form only for images so, i commented below code block.
    /*myDropzone.on("sending", function(file, xhr, formData) {
        formData.append("dropzone", "1"); // $_POST["dropzone"]
        formData.append("productId", "10"); // $_POST["productId"]
    });*/

    myDropzone.on("error", function(file, response) {
        console.log(response);
    });

    // on success
    myDropzone.on("successmultiple", function(file, response) {
        // get response from successful ajax request
        // response includes what you you return from php side
        console.log(response);
        $.each(response, function( key, value ) {
            $('form#product_create_form').append('<input type="text" name="gallery[]" value="'+value.name+'">')
        });


        /* submit the form after images upload
        (if u want to submit rest of the inputs in the form)
        I have no other inputs so, I commented below line. */
        //document.getElementById("mediaFormMultipleDropzone").submit();
    });

    // button trigger for processingQueue
    const submitDropzone = document.getElementById("submit-dropzone");
    submitDropzone.addEventListener("click", function(e) {
        // Make sure that the form isn't actually being sent.
        e.preventDefault();
        e.stopPropagation();

        if (myDropzone.files !== "") {
            // console.log(myDropzone.files);
            myDropzone.processQueue();
        } else {
            // if no file submit the form
            document.getElementById("dropzone-form").submit();
        }
    });
    // multiple
</script>
@endpush
A shorter version of the above Dropzone options code
@push('footer_scripts')
<script>
const myDropzone = new Dropzone("#mediaFormMultipleDropzone", {
    url: "{{ route('upload-media') }}",
    autoProcessQueue: false,
    uploadMultiple: true,
    addRemoveLinks: true,
    parallelUploads: 10,
    headers: {
        'X-CSRF-TOKEN': "{{ csrf_token() }}"
    },
    myDropzone.on("successmultiple", function(file, response) {
        // get response from successful ajax request
        // response includes what you you return from php controller side
        console.log(response);
        $.each(response, function( key, value ) {
            $('form#product_create_form').append('<input type="text" name="gallery[]" value="'+value.name+'">')
        });
    });

    // button trigger for processingQueue
    const submitDropzone = document.getElementById("submit-dropzone");
    submitDropzone.addEventListener("click", function(e) {
        // Make sure that the form isn't actually being sent.
        e.preventDefault();
        e.stopPropagation();

        if (myDropzone.files !== "") {
            // console.log(myDropzone.files);
            myDropzone.processQueue();
        } else {
            // if no file submit the form
            document.getElementById("dropzone-form").submit();
        }
    });
    // multiple
</script>
@endpush
If you images in dropzone gallery form then hidden inputs create like shown in the below image.
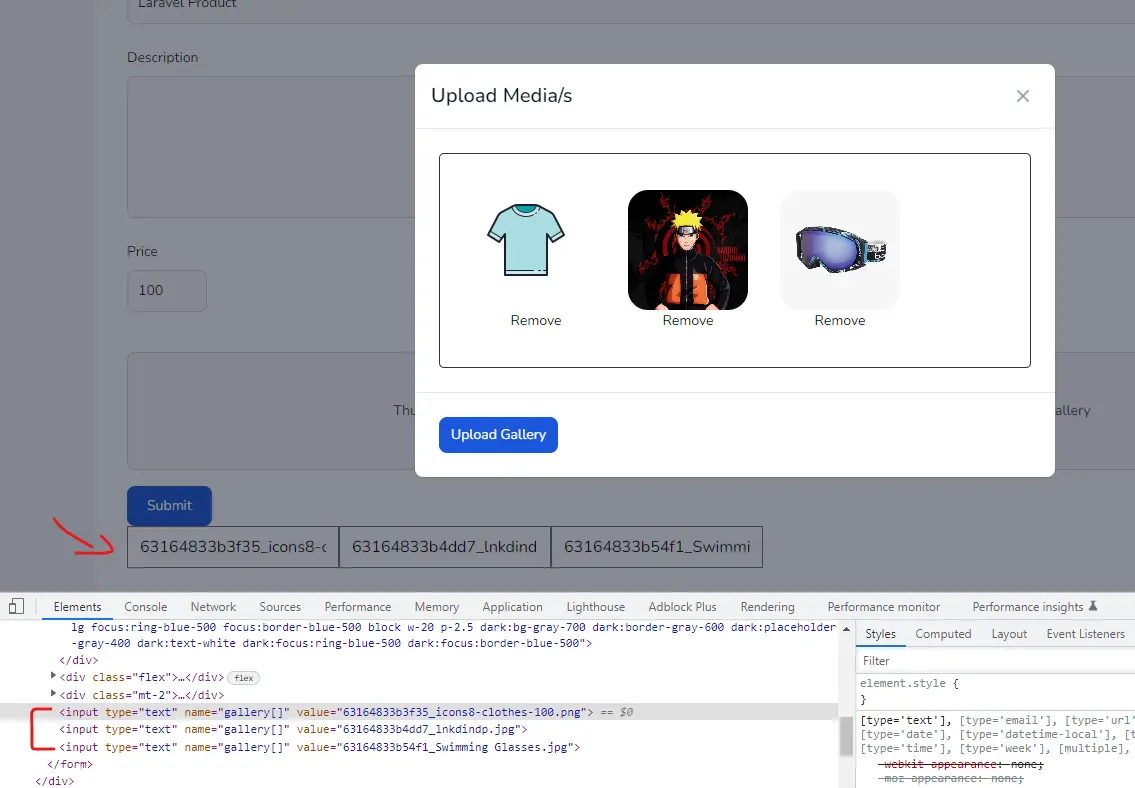
New /tmp/upload/ directory will create under /storage/
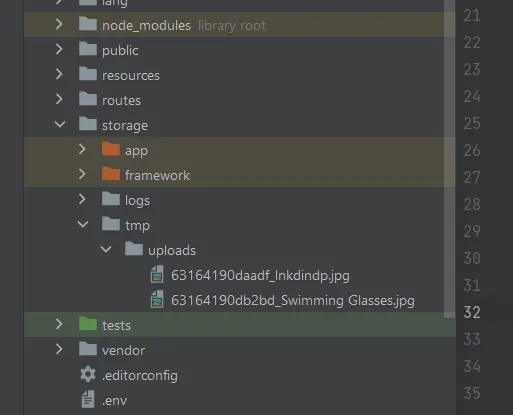
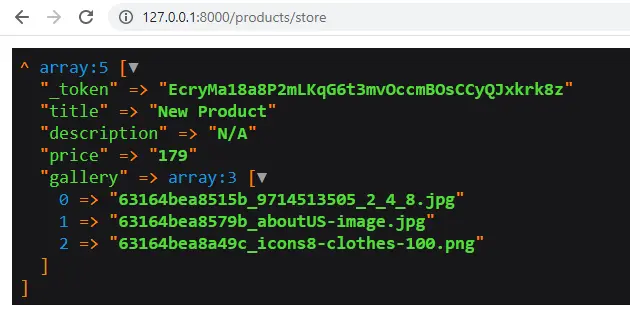
If I return die and dump dd() then the results will be
Code of files uploaded through Dropzone, add it in MediaController
in MediaController we have a __invoke method whenever we call MdeiaController the __invoke the method will auto call (invoked) you can create a method like uploadFile() if you go with some other method then made a change in web.php e.g
// __invoke route
Route::post('upload-media', MediaController::class)->middleware('auth:sanctum')->name('upload-media');

// or if you write some method like uploadFile then route would be
Route::post('upload-media', [MediaController::class, 'uploadFile'])->middleware('auth:sanctum')->name('upload-media');
class MediaController extends Controller
{

    public function __invoke(Request $request)
    {
        $response = [];

        $path = storage_path('tmp/uploads');
        if (!file_exists($path)) {
            mkdir($path, 0777, true);
        }

        $files = $request->file('files');
        if (is_array($files)) {
            foreach($files as $index => $file) {
                $name = uniqid() . '_' . trim($file->getClientOriginalName());
                $file->move($path, $name);


                $response[$index]['name'] = $name;
                $response[$index]['original_name'] = $file->getClientOriginalName();
            }
        }

        return response()->json($response);
    }
}
The files uploaded through dropzone form will be moved in /storage/tmp/images/ and __invoke method returns the path and file names moved by dropzone and we create inputs like <input type="hidden" name="gallery[]"> if the user uploads 2 images then 2 gallery[] inputs will be created and appended on the product form which is the form we will submit. the hidden input like this <input type="hidden" name="gallery[]" value="4782_imagename.png"> and now we are going to install Spatie Media-Library package this package helps to save gallery images in the database.
9. Install Spatie Laravel-medialibrary package
https://spatie.be/docs/laravel-medialibrary/v10/introduction
This package can associate all sorts of files with Eloquent models. It provides a simple, fluent API to work with.
Media Library can be installed via Composer:
composer require "spatie/laravel-medialibrary:^10.4.5"10. Preparing the database migration for Laravel-Medialibrary
You need to publish the migration to create the media table:
php artisan vendor:publish --provider="Spatie\MediaLibrary\MediaLibraryServiceProvider" --tag="migrations"

// After that, you need to run migrations.
php artisan migrate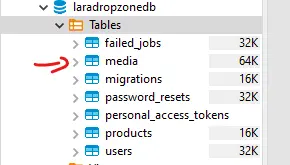
11. Modify Product Model
add HasMedia interface in the Product Model
namespace App\Models;

use Illuminate\Database\Eloquent\Model;
use Spatie\MediaLibrary\HasMedia;
use Spatie\MediaLibrary\InteractsWithMedia;

class Product extends Model implements HasMedia
{
    use InteractsWithMedia;

    protected $fillable = [
        'title',
        'name',
        'price',
        'description'
    ];
}
12. Before submitting the create product form here is the last step
// ProductController.php

public function store(Request $request)
{
    $product = Product::create([
        "name" => $request->input('name'),
        "description" => $request->input('description'),
        "price" => $request->input('price'),
    ]);


    // move gallery media
    if ($request->has('gallery')) {
        foreach ($request->input('gallery', []) as $file) {
            $product->addMedia(storage_path('tmp/uploads/' . $file))->toMediaCollection('gallery');
        }
    }

    $response = [
        'status' => 'success',
        'message' => 'Product added'
    ];
    return \response()->json($response);
}
Finally, Submit the create product form
Upload a few images in dropzone form, hit upload, and close the modal. fill create product fields like name, description, and price and submit the form. There will be two database tables modified one is product table and the second is media table. In media table, we will have ProductId (Model Id), type, and other info.


Dropzone js single file upload laravel.
Upload a Single image using dropzone. Two dropzone forms on a single page.
In this step, I am going to cover how to upload a single image.
Remember we have two dropzone forms added in create.blade.php above we cover how to upload multiple images and here we will see how to upload a single image. To upload a single image we need to modify a few dropzone options like those below.
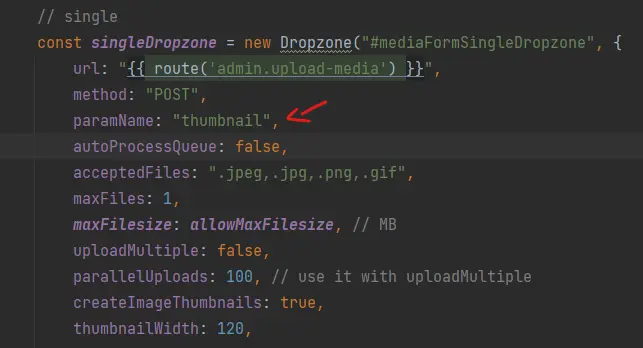
- paramName: “thumbnail” ( $request->input(‘thumbnail’) )
- maxFiles: 1,
- uploadMultiple: false,
- singleDropzone.on(“success” … (in multiple files we use Dropzone.on(“successmultiple”)
Now config thumbnail form working with dropzonejs
add below code inside @push('footer_scripts')
...
...
...


// single
const singleDropzone = new Dropzone("#mediaFormSingleDropzone", {
    url: "{{ route('upload-media') }}",
    method: "POST",
    paramName: "thumbnail",
    autoProcessQueue: false,
    acceptedFiles: ".jpeg,.jpg,.png,.gif",
    maxFiles: 1,
    maxFilesize: allowMaxFilesize, // MB
    uploadMultiple: false,
    parallelUploads: 100, // use it with uploadMultiple
    createImageThumbnails: true,
    thumbnailWidth: 120,
    thumbnailHeight: 120,
    addRemoveLinks: true,
    timeout: 180000,
    dictRemoveFileConfirmation: "Are you Sure?", // ask before removing file
    // Language Strings
    dictFileTooBig: `File is to big. Max allowed file size is ${allowMaxFilesize}mb`,
    dictInvalidFileType: "Invalid File Type",
    dictCancelUpload: "Cancel",
    dictRemoveFile: "Remove",
    dictMaxFilesExceeded: `Only ${allowMaxFiles} files are allowed`,
    dictDefaultMessage: "Drop files here to upload",
});

singleDropzone.on("addedfile", function(file) {
    //console.log(file);
});

singleDropzone.on("removedfile", function(file) {
    // console.log(file);
});

// Add more data to send along with the file as POST data. (optional)
/*singleDropzone.on("sending", function(file, xhr, formData) {
    formData.append("dropzone", "1"); // $_POST["dropzone"]
    formData.append("productId", "10"); // $_POST["productId"]
    formData.append("userId", "7"); // $_POST["productId"]
});*/

singleDropzone.on("error", function(file, response) {
    console.log(response);
});

// on success
singleDropzone.on("success", function(file, response) {
    // get response from successful ajax request
    // response includes what you you return from php side
    console.log(response);
    $.each(response, function( key, value ) {
        $('form#product_create_form').append('<input type="text" name="thumbnail" value="'+value.name+'">')
    });

    /* submit the form after images upload
    (if u want to submit rest of the inputs in the form)
    I have no other inputs so, I commented below line. */
    //document.getElementById("mediaFormMultipleDropzone").submit();
});

// button trigger for processingQueue
const submitSingleDropzone = document.getElementById("submit-single-dropzone");
submitSingleDropzone.addEventListener("click", function(e) {
    // Make sure that the form isn't actually being sent.
    e.preventDefault();
    e.stopPropagation();

    if (singleDropzone.files !== "") {
        // console.log(myDropzone.files);
        singleDropzone.processQueue();
    } else {
        // if no file submit the form
        document.getElementById("dropzone-single-form").submit();
    }
});
// single
Made an entry of thumbnail upload in MediaController.php
if (is_object($request->file('thumbnail'))) {
    $thumb = $request->file('thumbnail');
    $name = uniqid() . '_' . trim($thumb->getClientOriginalName());
    $thumb->move($path, $name);

    $response[0]['name'] = $name;
    $response[0]['original_name'] = $thumb->getClientOriginalName();
}


// Fill controller will be like below
class MediaController extends Controller
{

    public function __invoke(Request $request)
    {
        $response = [];

        $path = storage_path('tmp/uploads');
        if (!file_exists($path)) {
            mkdir($path, 0777, true);
        }

        $files = $request->file('files');
        if (is_array($files)) {
            foreach($files as $index => $file) {
                $name = uniqid() . '_' . trim($file->getClientOriginalName());
                $file->move($path, $name);


                $response[$index]['name'] = $name;
                $response[$index]['original_name'] = $file->getClientOriginalName();
            }
        }

        if (is_object($request->file('thumbnail'))) {
            $thumb = $request->file('thumbnail');
            $name = uniqid() . '_' . trim($thumb->getClientOriginalName());
            $thumb->move($path, $name);

            $response[0]['name'] = $name;
            $response[0]['original_name'] = $thumb->getClientOriginalName();
        }

        return response()->json($response);
    }
}
and add thumbnail media code in ProductsController.php
// single image or thumbnail code
if ($request->has('thumbnail')) {
    $product->addMedia(storage_path('tmp/uploads/' . $request->input('thumbnail')))->toMediaCollection('thumbnail');
}


// ProductController store method will be like
    public function store(Request $request)
    {
        $product = Product::create([
            "name" => $request->input('name'),
            "description" => $request->input('description'),
            "price" => $request->input('price'),
        ]);


        // thumbnail
        if ($request->has('thumbnail')) {
            $product->addMedia(storage_path('tmp/uploads/' . $request->input('thumbnail')))->toMediaCollection('thumbnail');
        }


        // move media
        if ($request->has('gallery')) {
            foreach ($request->input('gallery', []) as $file) {
                $product->addMedia(storage_path('tmp/uploads/' . $file))->toMediaCollection('gallery');
            }
        }

        $response = [
            'status' => 'success',
            'message' => 'Product added'
        ];
        return \response()->json($response);
    }
So, finally, we cover how to upload multiple files using dropzone, single file upload using dropzone.js and how to implement two dropzone forms in a single blade and handle both forms separately.
If you’ll have any queries then comment below or email me at [email protected]
